Contracts
What are StarkNet Contracts
A StarkNet contract is a smart contract that runs on the StarkNet platform. Developed by StarkWare, the Layer 2 scalability solution is designed to provide higher throughput and lower transaction fees for the Ethernet network.
Unlike Ether, StarkNet utilises Zero-Knowledge Proofs, which makes it possible to perform more computations on the chain while reducing the number of interactions with the main network, improving scalability and performance.
StarkNet contracts allow developers to build and deploy StarkNet-based distributed applications (DApps). Similar to Ethernet's smart contracts, StarkNet contracts can define rules and logic to perform a variety of operations such as transferring assets, logging data, and performing complex calculations.
Tool dependencies
As madara does not yet support cairo versions higher than 2.1.0.
The toolchain needs to specify a lower version!
- scarb (build toolchain and package manager for the Cairo and Starknet ecosystems)
- sncast (all-in-one tool for interacting with Starknet smart contracts, sending transactions and fetching chain data)
| # | version | description |
|---|---|---|
| sncast | 0.9.1 | All-in-one tool for interacting with Starnet smart contracts, sending transactions and fetching chain data. |
| scarb | 0.6.2 | Build toolchain and package manager for the Cairo and Starnet ecosystems. |
Install scarb
curl --proto '=https' --tlsv1.2 -sSf https://docs.swmansion.com/scarb/install.sh | sh -s -- -v 0.6.2
Install sncast
curl -L https://raw.githubusercontent.com/foundry-rs/starknet-foundry/master/scripts/install.sh | sh
Specify version
snfoundryup -v 0.9.1
What is Scarb?
What is scarb, the official package manager for StarkNet.
scarb makes developing StarkNet contracts easier in the following ways:
- When you install the Cairo package, it handles adding, updating and removing dependencies.
- You can use it to compile smart contracts.
- When you create your own Cairo package, it takes care of patching any libraries you need from Github and lets you know if there are version mismatches. You can then use the Cairo test runner to build and test your project. It's pretty fast.
- It includes the built-in Cairo compiler, so there's no need to set up any additional tools unless you're actually a compiler developer.
- It contains bundled binaries for the Cairo Language Server, which you can use to
- It works well with other tools in the Cairo ecosystem such as Foundry and Dojo.
What is sncast
What is sncast? sncast is a command line tool for interacting with StarkNet smart contracts, sending transactions and fetching chain data.
The Starknet Foundry includes the following features:
- Fast testing framework Forge. forge is comparable to Cairo Test Runner, but with a better user experience. You can test standalone features in smart contracts and embed complex deployment processes.
- Contract printing is supported. According to the documentation, debugging will be available when support is added to the Starknet compiler.
- The online Foundry Book provides a wealth of useful information and guidance for writing and running tests and interacting with Starknet.
- sncast is an integrated CLI designed to perform Starknet RPC calls, send transactions, and fetch Starknet chain data. You can use sncast to declare, deploy, and interact with contracts using Starknet JSON-RPC.
Deploying Contracts Flow
- Compile the contract
- Declare Contracts
- Deployment
Tutorials
Build Contracts
The following is an example of a build contract
Clone Example Project
git clone https://github.com/Generative-Labs/web3mq_bridge_contract.git
cd web3mq_bridge_contract
Checkout cairo version 2.1 branch git checkout cairo_2.1.0
git checkout cairo_2.1.0
Build the contract using scarb
scarb clean && scarb build
Declaration
sncast --account 0x3 --url http://127.0.0.1:9944 \
    declare --contract-name Web3mqBridge

The class_hash returned by the server when the contract is currently declared is needed in the deployment step.
Deploy
sncast \
    --account 0x3 \
    --url http://127.0.0.1:9944 \
    deploy \
    --class-hash <class-hash> \
    --constructor-calldata "<Address> <Address>"
The <class-hash> is the clash_hash of the terminal output from the previous declaration.
--constructor-calldata is the contract constructor argument. Constructor arguments vary from contract to contract, see the contract code for details.
In our bridging contract, the parameters are the values of two addresses (here we have entered the address of the account we just deployed).
If you haven't deployed an account yet, you can read the documentation on deploying accounts.

The contract_address returned by the command line is the address of the successfully deployed contract.
NFT Contracts
Build NFT Contracts
The following is an example of building an NFT contract
git clone https://github.com/Generative-Labs/madara-nft-contract
cd madara-nft-contract
As madara does not yet support cairo versions higher than 2.1.0, the toolchain needs to specify a lower version!
The toolchain needs to specify a lower version!
curl --proto '=https' --tlsv1.2 -sSf https://docs.swmansion.com/scarb/install.sh | sh -s -- -v 0.6.2
Build the contract using scarb
scarb clean && scarb build
Declare the NFT contract
sncast --account 0x3 --url http://127.0.0.1:9944 \
    declare --contract-name MadaraNFT

The class_hash returned by the server when the contract is currently declared is needed in the deployment step.
Deploying the NFT contract
sncast \
    --account <account_name> \
    --url http://127.0.0.1:9944 \
    deploy \
    --class-hash <class-hash>
<class-hash> is the clash_hash of the terminal output from the previous declaration.
If you haven't deployed accounts yet, you can read the documentation on deploying accounts.
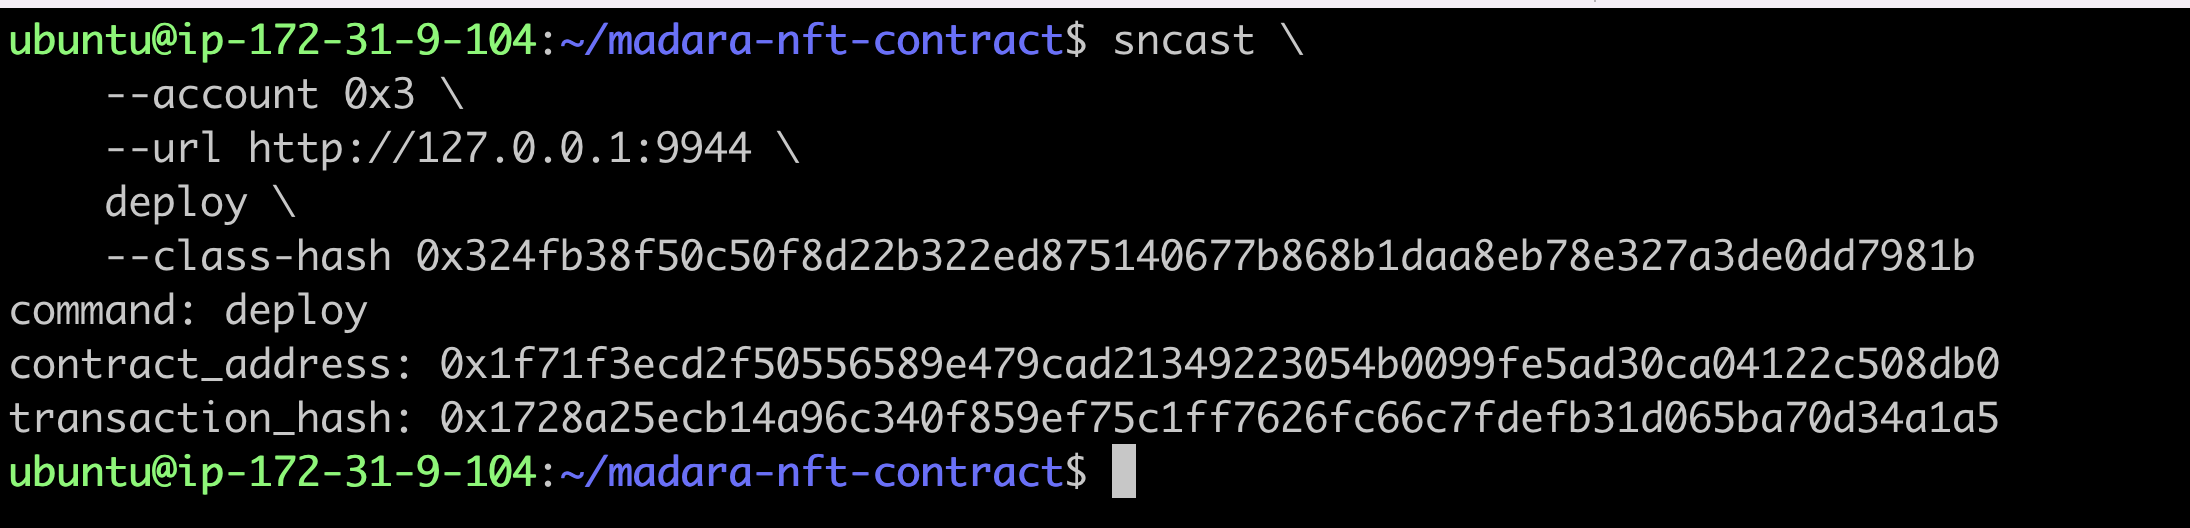
The contract_address returned by the command line is the address of the successfully deployed contract.
Mint
The token_id is the u256 type in cairo. The u256 has two components, high and low, in the form of an array.
token_uri_hex is the type felt252 in cairo.
Here is an example of using token_uri_hex in python
token_uri = 'i.ibb.co/7XK7CDZ/im-394091.jpg'

token_uri_hex = hex(int.from_bytes(token_uri.encode('utf-8'), 'big'))
sncast -u http://127.0.0.1:9944 \
    --account 0x3 \
   invoke --contract-address <contract_address> \
   --function "mint_with_url" \
   --calldata "<token_id> <token_uri_hex>"

Check Mint results
sncast -u http://127.0.0.1:9944 \
   call --contract-address <contract_address> \
   --function "token_uri" --calldata "<token_id>"

Transferring the NFT
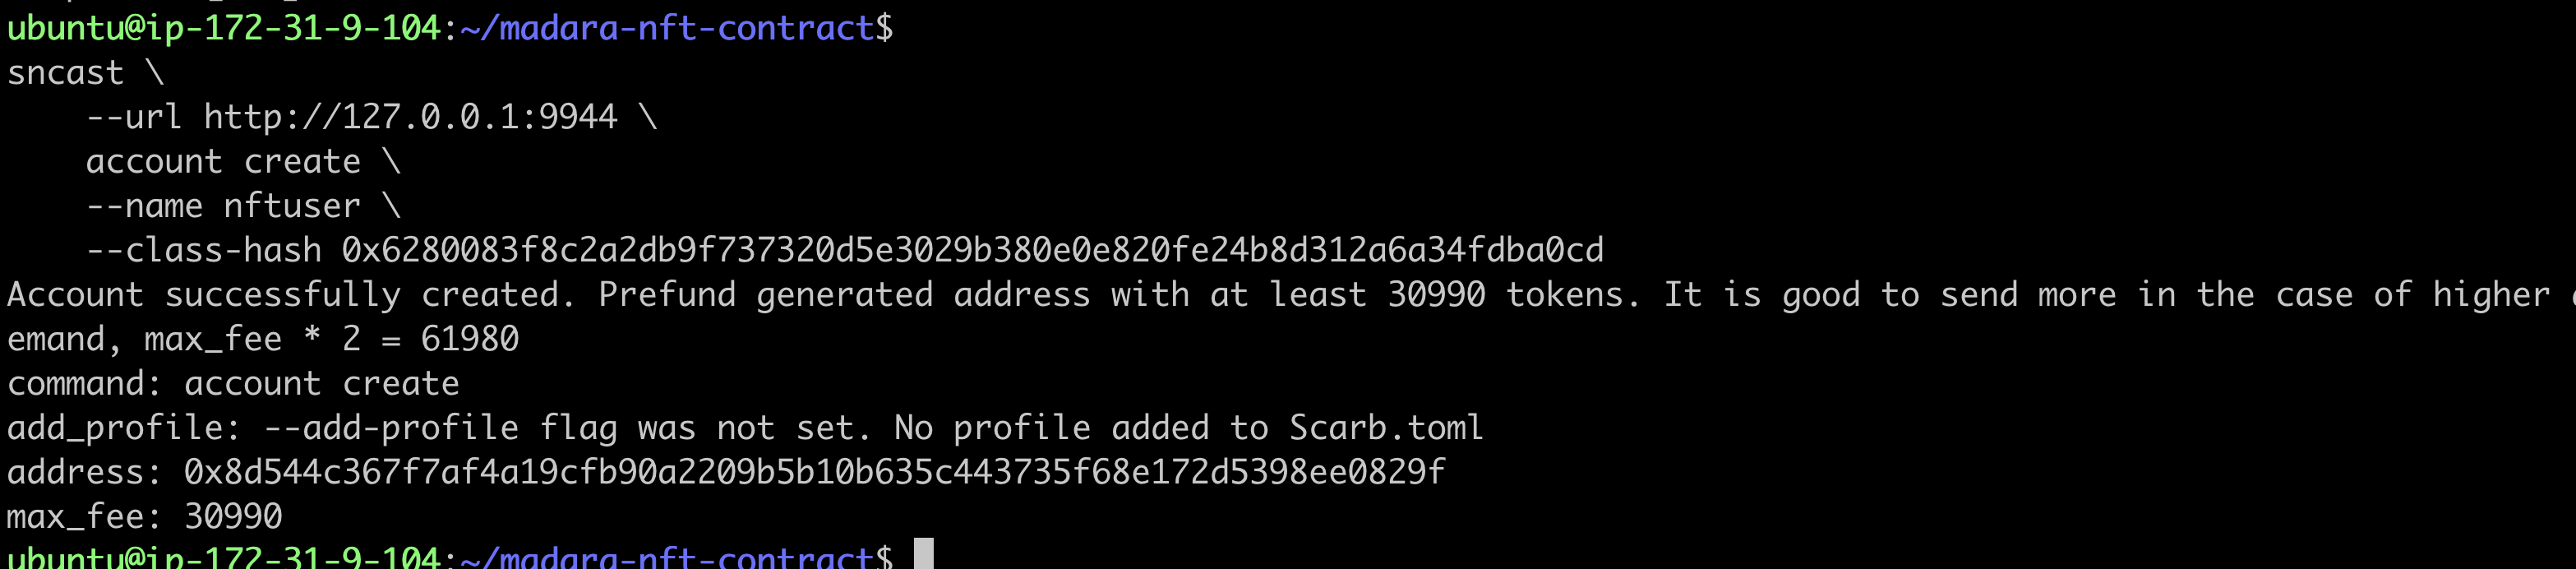
Before transferring the NFT, a new account needs to be deployed.
create account
sncast \
    --url http://127.0.0.1:9944 \
    account create \
    --name <account_name> \
    --class-hash 0x6280083f8c2a2db9f737320d5e3029b380e0e820fe24b8d312a6a34fdba0cd
Update Account Balance
sncast -u http://127.0.0.1:9944 \
   --account 0x3 \
   invoke --contract-address 0x49d36570d4e46f48e99674bd3fcc84644ddd6b96f7c741b1562b82f9e004dc7 \
   --function "transfer" \
   --calldata "<YourAddress> 100000 100000"

Deploying a new account
sncast --url http://127.0.0.1:9944 \
    account deploy \
    --name <account_name> --max-fee 86460

Transferring NFT to a new account
sncast -u http://127.0.0.1:9944 \
   --account <origin_account_name> \
   invoke --contract-address <contract_address> \
   --function "transfer_from" \
   --calldata "<origin_account_address> <new_account_address> <token_id>"

Checking NFT transfer results
sncast -u http://127.0.0.1:9944 \
  call --contract-address <contract_address> \
   --function "owner_of" --calldata "<token_id>"

You can see that the NFT has been transferred to the new account.